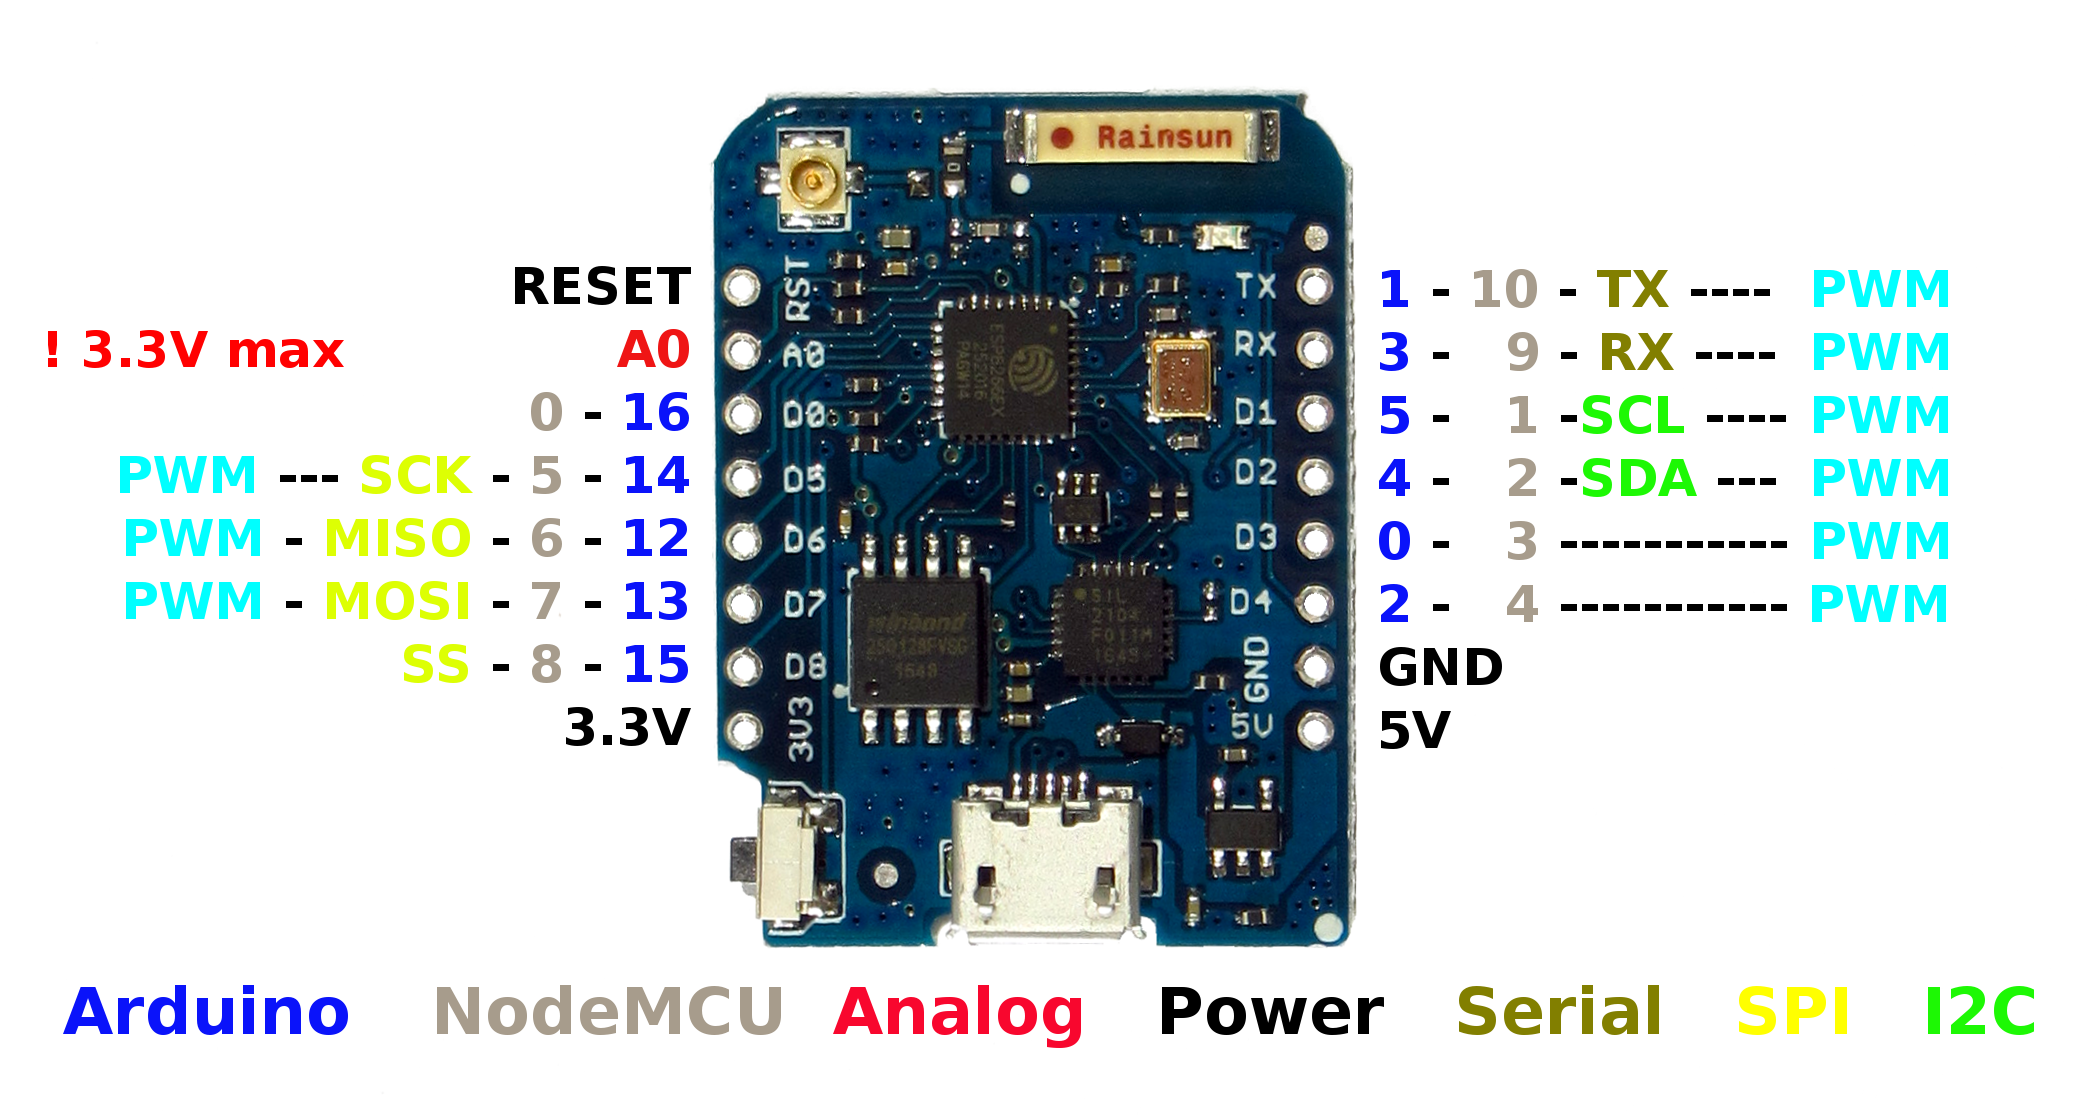
The Wemos D1 Mini is based on the ESP-8266EX microprocessors. This microprocessor contains a WiFi sender and receiver and is much more powerful than an Arduino Uno. The D1 Mini is equipped with 4MB flash memory to store programs and a whopping 520KB of RAM. Despite the much higher capabilities compared to the Arduino, the Wemos D1 Mini is quite small: only 34.2 x 25.6 mm. In contrast to the Arduino Uno, this system runs on 3.3V. The system can be damaged by 5V on its I/O pins. Make sure you use compatible 3.3V shields, or a suited voltage converter.
The microprocessor does not run an operating system and has a very limited runtime system supporting your program. This has the advantage that your program is in full control over the system. Your program can directly control the I/O pins and other parts of the microcontroller. The disadvantage is that there is limited runtime support. Your program determines completely what is executed in each clock cycle of the Arduino.
The D1 Mini has 11 digital I/O pins, 1 analog input pin, The board can be powered by a micro USB cable or a battery.

Setup
Windows
The board is equipped with a CH340 USB driver. The chip requires specific drivers on Windows. These can be found here https://docs.wemos.cc/en/latest/ch340_driver.html. Run the SETUP.EXE file and press install. If it cannot find the INF file, find the file ‘CH341SER.INF’ in the same folder as SETUP.EXE, right click and press install from the context menu.
MacOS
DO NOT INSTALL THESE DRIVERS IF YOU ARE ON MAC OSX MOJAVE 10.14 OR GREATER! These drivers have since been included with MacOS, so only install them if you are running a lower version of MacOS.
Linux
Linux-based systems typically have the necessary drivers pre-installed. However, the USB port connection might not be accessible to the Arduino IDE or the user due to permission settings.
The USB port, visible in the filesystem as /dev/ttyUSB0, may not have read/write permissions for your user. To resolve this, you need to add your user to the correct group. On Ubuntu systems, this group is dialout. On other distributions, it might be uucp.
Please refer to your Linux distribution’s documentation for specific instructions on setting up Arduino and configuring the correct permissions.
Arduino IDE
After installing the proper drivers, we need to get the board working with the Arduino IDE. To do this, follow these steps:
- Open the preferences window by going to
File > Preferences. - Enter the following URL into the
Additional boards manager URLSfield:https://arduino.esp8266.com/stable/package_esp8266com_index.jsonMake sure the field does not have any extra spaces in there, as this will cause it to not recognize the URL. - Open the board manager by going to
Tools > Board > Boards Manager..., search for the ‘esp8266’ boards package, and install it - Select the correct board by going to
Tools > Board > esp8266and selectLOLIN (WEMOS) D1 R2 & Mini. - Set the correct port in
Tools > Port. Setting the correct communication (COM) port depends on your setup. If you plug in the Wemos D1 Mini and your drivers are setup correctly, you should be able to see a list of available ports there. One of these should be your D1 Mini. - Make sure you set the correct upload speed by going to
Tools > Upload Speedand set it to115200.
Example Program
void setup() {
   pinMode(LED_BUILTIN, OUTPUT); // initialize pin as output
   Serial.begin(9600); // initialize serial communication
   Serial.println("Hello, world!"); // print "Hello, world!" to the serial monitor
}
void loop() {
   digitalWrite(LED_BUILTIN, HIGH); // switch LED on (HIGH voltage)
   delay(1000); // wait 1000 ms, i.e. 1 s
   digitalWrite(LED_BUILTIN, LOW); // switch LED off (LOW voltage)
   delay(1000); // wait a second
}
Troubleshooting
esptools - Timed out waiting for packet header
- Remove the USB cable from the D1 Mini
- Connect the D3 pin to the GND pin
- Reconnect the USB cable and upload your program
- Disconnect the D3 and GND pin