Now that you have the 3D model of the part you want to print, you need to slice it. Slicing is the process of taking a 3D model and turning it into instructions (GX Code) for a 3D printer. This process is done in a program called a slicer. There exist a lot of slicing programs, but since we are using FlashForge printers it is easiest to use their own slicing software, FlashPrint. You can download that program here.
This article will focus on FlashPrint specifics, but the gist of everything can be transferred to other slicers if you prefer/require them.
Using FlashPrint
In the bottom left, make sure you have selected the correct printer that you are trying to print on, either the Adventurer 4, or the Adventurer 5M Pro. Leave the other printer settings to their default values.
You can import your model into the program by going to File -> Load File or simply dragging the model file into the program.
FlashPrint has a lot of useful tools like cutting the model into parts if it does not fit in the printer, duplicating the object if you need to print multiple ones, but the most important ones are move, scale, and supports.
You want to ensure that the model fits on the build plate and that it sits flush on the bottom. The print will fail if you have floating parts. With the scale setting, you can check that the dimensions of your model are correct and make changes before you print it.
Supports
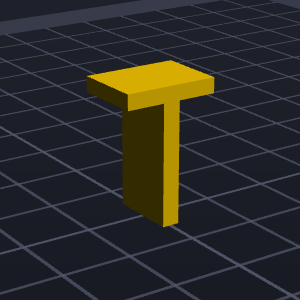
3D printing is a physical process, meaning that objects must adhere to the laws of physics, particularly gravity. This is easy to overlook when designing your model on a computer, as they can “float” without issue. In reality, unsupported areas can lead to failed prints. For this section, we will use this model of the letter ‘T’ as an example model to print.
 Example model of the letter ‘T’.
Avoiding Supports
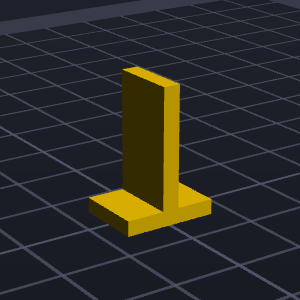
Sometimes, the easiest solution is to rotate or reorient the object to minimise or eliminate unsupported areas. FlashPrint will usually try to orient your model optimally automatically once you import it. For our ‘T’, it would be more optimal to flip it on its head or on its side. This eliminates the need for supports, as there are no more parts floating in mid air.
 ‘T’ with improved orientation
Adding Supports
If reorienting is not possible, supports must be added to stabilise overhanging parts. These are extra structures that are added alongside your model to “hold up” the floating sections during printing. Most slicers, including FlashPrint, can automatically generate supports for you. However, manual adjustments or supports need to be done for more complex designs.
Supports have several settings that influence the success of your print, such as base and point diameter. The base diameter must be large enough to provide support for the print, while the point diameter has to be small enough to be easily removable, but large enough to support overhangs effectively.
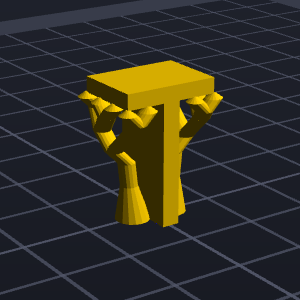
In the case of our example model, reorienting it would be the optimal approach. However, as an example, supports have been added for illustration purposes below.
 ‘T’ with added supports
Raft vs. Brim
When you slice a print, especially with supports, the slicer might ask if you want to add a raft or a brim.
A raft is a flat thin layer of material printed beneath your model. It helps to provide a solid, flat foundation for your model and helps with supports as they can be printed on top of the raft.
A brim is multiple lines of material that form a perimeter around the base of your model. It can help with adhesion to the build plate, shrinkage of the first layers, and they use a lot less filament than a raft.
If you have supports that are resting on the build plate, a raft or brim should be added to help with removal of the supports and to help the build structure.
Slicing
Once you have finished placing and orienting your model and have added supports, you can start slicing. You can use the standard slice profile that FlashPrint has selected. It will slice your model and from there on you can do a preview of the model if it is complex and you want to just double check that it has sliced correctly.
From here on out you can download the file and ask a Student Assistant for access to the printers. More information about the printing process can be found here.